- Interviews
-
Benefits
-
Ancillary Benefits (Voluntary for employer or employee)
 Guide
Guide Tools & Suppliers
 Employee Wellness Program Ideas that will help you Attract Top Talent
- What is the Purpose of Form 5500?
- What Is Included in a Job Relocation Package?
- Understanding Paid Holidays and Why Employers Want to Provide Them
- What is the Collective Bargaining Agreement?
- Basics of the Pension Benefit Guaranty Corporation (PBGC)
- Increased Penalties for Employee Benefit Plans under ERISA
- Benefit Plan Tax Filings and Reporting
- Benefits Funding- Taxable / Non-taxable
-
Benefits Laws and Regulations
- Guide
- Tools & Suppliers
- What Is a Qualified Retirement Plan?
- Benefit Eligibility and Eligible Dependents
- What Is a Qualifying Event for Health Insurance?
- Dealing with Employee Addictions
- Ways to Improve Open Enrollment
- What is a Section 125 Plan?
- What are Ancillary Benefits?
- Tax Benefits for Businesses Who Have Employees with Disabilities
- Benefits Service Providers (Brokers, Carriers, Record-keepers)
- Medical/Healthcare Insurance
-
Retirement Plans - Defined Contribution / Defined Benefit
- Guide
- Tools & Suppliers
- Top 13 401(k) Providers in 2025
- 5 Best Retirement Planning Tools and Software 2024
- Best Global Benefits Services
- What is Nonqualified Deferred Compensation?
- Employee Health Insurance Coverage for Big Companies
- Do You Have a Long-term and Short-term Disability Insurance?
- List of Statutory Benefits for Employees
- Statutory Benefits
- Union Benefits - Labor Relations
-
Ancillary Benefits (Voluntary for employer or employee)
-
Compensation-Pay
-
Compensation Planning
- Guide
- Tools & Suppliers
- Understanding Cost of Living Vs. Merit Pay Increases
- A Complete Guide on Salary Benchmarking
- 5 Best Compensation Planning and Analysis Tools in 2024
- What is Equity Compensation & How It Work?
- Guidance on All Salary Planning Negotiations
- What is Pay-for-Performance Compensation
- Top Important Compensable Factors in Job Descriptions
- What is a Merit Increase and Why They Matter?
- Designing Pay Structures for Small Organizations
- Compensation Tools and Hourly / Yearly Wage Calculators List
- Compensation Market Pricing Analysis: Preferred Types
- Employer of Record
-
Forms of Compensation
- Guide
- Tools & Suppliers
- Location-Based Salaries vs. Value-Based Salaries
- Types of Compensation: Everything HR Needs to Know
- The Importance of Sick Pay for HR Management
- Things to Know about Year-End Bonuses
- How Do Employees Benefit from Shift Differential?
- How Does Mileage Reimbursement Work?
- The Strategic Value of HR in Sales Compensation Design
-
Laws and Regulations - Compensation and Pay
- Guide
- Tools & Suppliers
- How to Pay a Remote Contractor?
- What is Futa and Suta Tax?
- Main Difference Between Self-Employment vs. Independent Contractor
- What is State Income Tax Withholding?
- Payroll Taxes and Employer Responsibilities
- How Much is the Minimum Wage?
- FICA Tax Funds Retirement and Medical Benefits for Retirees
- Where Are Salary Budgets Headed?
- Employer's Liability for Employment Taxes
- Keeping Your Business Compliant With Payroll Tax Requirements
- Navigating Multistate Unemployment Tax Reporting and Remittance
- FLSA Exempt and Nonexempt Defined
- Ways Employers Should Prepare for Equal Pay Laws
-
Payroll
- Guide
- Tools & Suppliers
- Top 12 Enterprise Payroll Software in 2025
- 14 Best Global Payroll Service Providers of 2025
- 11 Best Payroll Software for Small Businesses in 2025
- 12 Best Payroll Software 2025
- List of Top Pay Equity Software in 2025
- 10 Best Trucking Payroll Software Vendors in 2025
- 11 Best PTO Tracking Software 2025
- What is Payroll Schedule & It's Types
- In-House Payroll vs. Outsourcing: Which is Better?
- Automated Payroll vs. Manual Payroll in 2024
- Top 15 Tips to Track Payroll Metrics
- 8 Best Payroll Software 2024
- How to Create a Pay Stub for Employees?
- 11 Best Global Payroll Service Providers of 2024
- What is Global Payroll?
- What is payroll accounting?
-
Total Compensation
- Guide
- Tools & Suppliers
- 5 Best Compensation Tools 2024 in HRM
- Benefits as a Preferred Form of Compensation
- Paid Time Off Payout Laws by State
- Ways to Improve Open Enrollment
- What is a Section 125 Plan?
- What are the Advantages of the Roth 401(k)?
- How to Determine Your PTO Policy
- Help Employees Find the Best Strategy for Their HSAs
- What are Ancillary Benefits?
-
Unions
- Guide
- Tools & Suppliers
- The Benefits of Collective Bargaining
- What Role Does an HR Manager Play in Labor Contract Negotiations?
- What is a Collective Bargaining Agreement?
- How Collective Bargaining Agreements Work
- What is a Collective Bargaining Agreement & How It Works?
- Why Companies Should Offer Supplemental Life Insurance
-
Compensation Planning
-
Employment Law
- ADA Americans with Disabilities Act
-
Benefits Laws and Regulations
- Guide
- Tools & Suppliers
- Employee Assistance Program (EAP): 10 Best Providers in 2025
- Best Corporate Wellness Software in 2024
- What Are California Employment Laws 2024?
- What is an Employee Assistance Program (EAP)?
- Employers Enhance Emotional and Mental Health Benefits
- How HR Professionals Can Help Their Employees Choose Medical/Healthcare Insurance
- Benefit Eligibility and Eligible Dependents
- What Is PCORI and How Does It Affect Employers
- What Is a Qualifying Event for Health Insurance?
- Dealing with Employee Addictions
- What Workers Compensation Insurance Is All About
- What is HIPAA Compliance
- Do You Have a Long-term and Short-term Disability Insurance?
- What are Ancillary Benefits?
- List of Statutory Benefits for Employees
- Understanding Employee Health and Disability Benefits
- Tax Benefits for Businesses Who Have Employees with Disabilities
-
Business Operations & Conduct
- Guide
- Tools & Suppliers
- 11 Best Business Process Management (BPM) Software in 2025
- 11 Best Field Service Management Software of 2025
- 10 Best Integrated Risk Management Software in 2025
- 10 Best Corporate Social Responsibility (CSR) Software of 2025
- 11 Best IT Service Management (ITSM) Tools of 2025
- 10 Best Visitor Management Software in 2025
- Organizational Life Cycle: Definition, Models, and Stages
- 10 Best Business Process Automation Tools in 2025
- 11 Best Employee Intranet Platforms in 2025
- 10 Best Customer Relationship Management (CRM) software in 2025
- What is Departmentalization? Definition, Types, and Examples
- What is Workation? A Complete Guide for Employers
- 12 Best Workflow Management Software in 2025
- Top 15 Knowledge Management Software in 2025
- What is Projective Assessment in the Workplace & Its Types?
- Who Can Join a Union and Who is Excluded?
- What is a Workplace Assessment & Its Benefits?
- Overstaffing: Meaning, Causes, Issues & Solutions to Avoid
- 12 Best Project Management Tools for Teams in 2025
- Best 6 Enterprise Mobile Security Software for 2025
- What Is Talent Mobility and How to Develop a Strategy
- 10 Best Strategic Planning Software Tools in 2025
- 12 Best Help Desk Software for 2025
- 10 Best Expense Reporting & Management Software in 2024
- 10 Best Hot Desk Booking Software in 2024
- 10 Best Process Improvement Tools to Enhance Performance & Productivity
- 10 Best Customer Experience Management (CEM) Software of 2024
- 10 Best ERP Software in 2024
- 10 Best Customer Loyalty Software of 2024
- What is Expense Management Software?
- Eisenhower Matrix: Meaning, Prioritization Framework, Examples
- 10 Best Financial Services Software 2024
- 10 Best SOC 2 Compliance Software in 2024
- 10 Best Strategic Planning Software Tools in 2024
- 10 Best Resource Management Software 2024
- 12 Best Project Management Tools for Teams in 2023
- 10 Best Resource Management Software 2024
- Top 10 Digital Workplaces of 2024
- Top 10 Procurement Software in 2024
- AI Workflow Automation: Meaning, Types & Benefits
- How to Start an Employee Resource Group (ERG)?
- Workflow Management: Meaning, Types, Benefits & Components
- Different Types of Harassment in the Workplace
- Challenges Facing HR in Merger & Acquisitions
- What is HR's Role in the Mergers & Acquisitions Process
- How Relocation Affects the Employment At-Will Relationship
- The Role of Human Resources in Workplace Harassment
- Key Human Resource Management Policies & Procedures
- The Importance of Ethics in Human Resources
- Confidential and Proprietary Information of Employer
- What is Anti-Bribery and Anti-Corruption Policy?
- What Is a Non-Compete Agreement in HR?
- Unpaid Payroll Tax Penalties and Fines for Businesses
- What is an Effective Electronic Use Policy?
- Nondisclosure Agreements to Protect Your Intellectual Property
- How to Develop an Employee Handbook
- What are the Essential Functions of a Job Under the ADA
- When and How Employers Test for Drug and Alcohol Use
- How to Develop a Code of Conduct for a Company
-
DOL Department of Labor
- Guide
- Tools & Suppliers
- Criminal Penalties for Human Resources Violations
- HR Compliance- Reporting New Employees
- What is Considered an ERISA Plan?
- How the FMLA Affects Your Company
- Pros and Cons of Right to Work
- How Do I Pay an Independent Contractor
- Employees Have Differences in How They Are Classified and Paid
-
EEOC Equal Employment Opportunity Commission
- Guide
- Tools & Suppliers
- How to Address Gender Pay Gap in the Workplace?
- What is Title VII of the Civil Rights Act, and what is its purpose?
- Affirmative Action Plan (AAP)
- What's the Genetic Information Nondiscrimination Act (GINA)?
- How Should HR People Handle Age Discrimination in a Company
- Ways Employers Should Prepare for Equal Pay Laws
-
FLSA Fair Labor Standard Act
- Guide
- Tools & Suppliers
- Exempt vs. Non-Exempt Employees: What’s The Difference?
- How Do Employees Benefit from Shift Differential?
- Federal and State Minimum Wage Regulations, Exceptions, and History
- Overtime: Who Is Eligible to Be Paid Overtime?
- Fair Labor Standards Act (FLSA) laws & HR compliance analysis
-
Hiring & On-boarding
- Guide
- Tools & Suppliers
- 11 Best Freelance Management Software in 2025
- 14 Best Candidate Assessment Tools to Consider in 2025
- 12 Best Recruitment Marketing Platforms in 2025
- What is Talent Rediscovery?
- Internal Mobility vs. External Hiring: Choosing the Right Talent Strategy for Business Success
- Top 10 Predictive Hiring Software in 2025
- 10 Best Legal Recruiting Software for 2025
- 10 Best Recruiting Database for Hiring in 2025
- 10 Best Diversity Recruiting Software for Inclusive Hiring in 2025
- Full-Cycle Recruiting: What is it and How Does it Work?
- What is Hire-to-Retire (HTR)?
- Top 10 Virtual Hiring Tools in 2025
- Collaborative Hiring: How Team-Based Recruitment Improves Hiring Success
- People-First Hiring: Quick & Effective Strategies for Success
- How to Hire Top Talent Using Psychometric Assessment
- 12 Best AI Recruiting Tools for HR Professionals in 2025
- How to Boost Your DE&I Sourcing with AI?
- Difference Between Culture Add and Culture Fit
- What is Interim Management?
- What is the Role of AI in Staff Augmentation?
- The Ultimate Guide to Neurodiversity Hiring
- 10 Best Freelance Recruiting Software in 2025
- 10 Best Coding Assessment Platforms in 2024
- What is Underrepresented Talent and Best Strategies for Sourcing the Talent
- What is Unicorn Hiring?
- What is a Backfill Position and Why is It Important?
- What is Skills-Based Hiring?
- 10 Best Recruiting Hacks To Find The Best Job Candidates in 2024
- 12 Best Talent Intelligence Software in 2024
- 12 Best Recruiting Automation Software in 2024
- 10 Best Candidate Sourcing Tools in 2024
- How to Build and Maintain Candidate Database in 2024?
- What is a Boomerang Employee?
- What is Skills-First Hiring?
- Top Benefits of Hiring a Virtual Assistant (VA)
- 10 Best Recruiting Software in 2024
- What is Internal Hiring?
- Top 10 Talent Acquisition Software in 2024
- Top Strategies for Hiring During Recession
- New Hire Orientation vs. Onboarding: A Complete Guide for Employers
- Best Practices for Onboarding and Training New Employees Remotely
- A Complete Guide to Talent Experience
- What is Virtual Recruiting?
- What are Pre-Employment Assessments?
- HR Managers and Their Responsibility for Employee Relocation
- What Does Employee Handbook Mean?
- The Bona Fide Occupational Qualification in Employment Law
- What Is a Conditional Letter of Employment?
- Networking for Employers while Looking to Hire – How HR should do Networking in order to find Candidates.
- Who Pays Unemployment Tax?
- Labor Relations - Unions
- State and Regional Regulations
-
Taxes and Withholding
- Guide
- Tools & Suppliers
- 5 Types of Human Resources Violations in the Workplace
- 5 Best Tax Software for 2024
- 5 Best Tax Software for 2024
- 11 Best Tax Practice Management Software 2024
- Tax Treatment of Employer-Paid Relocation Expenses
- What is the Difference Between an Employee and an Independent Contractor?
- Examples of Independent Contractors and Employees
- Are Employers Required to Withhold Taxes on an Hourly Employee
-
Termination of Employment
- Guide
- Tools & Suppliers
- What Is Garden Leave? A Guide for Employers
- Furlough vs. Layoff: What’s the Difference?
- How to Retain Employees During the Great Resignation
- The Great Resignation: How Employers and Employees Should Prepare
- What is Wrongful Termination?
- What are the Benefits of Reduction in Force (Mass Layoffs)?
- How to Conduct a Successful Reduction-in-force
- HR & Employment Issues when Relocating Your Business
- Type of Intellectual Property Dictates Protection Needed
- What Should Be Included in a Separation Agreement
-
Work Visas - Immigration
- Guide
- Tools & Suppliers
- 5 Best Work Visa Immigration Consultants in 2023
- Understanding and Obtaining U.S. Employment Visas
- What HR Needs to Know About Working with Labor Unions
- Unites States Citizenship and Immigration Services (USCIS) Guide
- U.S. Work Visas and Eligibility Requirements
- Types of US Work Visas and Requirements
-
Employment Practices
-
Compensation and Benefits Practices
- Guide
- Tools & Suppliers
- 10 Best Employee Benefits and Compensation Management Software in 2025
- 16 Best Benefits Administration Software in 2025
- Top 10 Compensation Courses & Certifications in 2024
- Commuter Benefits: Everything You Need to Know
- What is the Wage Protection System?
- What is Leave Encashment? Calculation, Taxation, and Rules
- A Complete Guide on Salary Transparency
- What is Volunteer Time Off (VTO) and How to Use it?
- What is an Employee Assistance Program (EAP)?
- What HR Needs to Know About Workers’ Compensation Insurance
- The Importance of Communicating Context around Pay
- Top 10 Employer FMLA Mistakes
- Managing Your Remote Workers with Employee Remote Work Policy
- Why You Should Hire an Insurance Broker
- What Are Paid Personal Days Time Off?
- How to Calculate Accrued Vacation Pay
- How Does a Sick Day Work?
- Are Employers Required to Notify Open Enrollment?
- Asking Applicants to Disclose Salary Requirements
- 2020 Minimum Wage by State Full List
- The Pros and Cons of a Paid Time Off Policy
- Legal Holiday Pay Practices: Employers Most Frequently Asked Questions
- What Workers Compensation Insurance Is All About
- Understanding Paid Holidays and Why Employers Want to Provide Them
- What is the Collective Bargaining Agreement?
- What are Health Savings Accounts?
- How to Hire a Health-Insurance Broker
-
Employee Conduct/Behavior
- Guide
- Tools & Suppliers
- 10 Best Employee Incentive Software of 2025
- Top 10 Remote Employee Monitoring Software in 2025
- 17 Best Rewards Systems for Employees in 2025
- 14 Best Employee Experience Software in 2025
- Top 10 Employee Lifecycle Management Software in 2025
- Workplace Conflict Resolution: A Complete Guide
- 10 Best Employee Goal Management Software in 2025
- 10 Best Team Communication Software & Apps in 2025
- 13 Best 360 Degree Employee Feedback Software in 2025
- Employee Break Room: Importance & Ideas
- How to Identify and Deal with High-Performing Toxic Employees?
- What is Workplace Etiquette? Do's and Don'ts
- Disgruntled Employee: Meaning, Threats & Ways to Deal
- What is Employee Commitment?
- What is Team Cohesion and Why is It Important?
- What Causes Employee Resentment & How to Deal With It At Work?
- Job Satisfaction: Definition, Components, Types & Importance
- How to Avoid Conflict in the Workplace?
- Inductive vs Deductive Reasoning in the Workplace
- How AI Improve Employee Engagement and Retention?
- What is Employee Misclassification
- Top Benefits of Skills Alignment in the Workplace
- 12 Best Employee Productivity Tracking Tools in 2025
- Top 17 Employee Recognition Software in 2025
- 20 Best Employee Engagement Software for 2025
- Best Employee Engagement Podcasts To Listen In 2025
- Top 10 Employee Appreciation Messages
- What is Ableism & How to Combat It in the Workplace?
- What is RACI Chart?
- Workload Planning: A Complete Guide for Your Teams
- Top Signs of Overworked Employees & How to Deal With It?
- What is Team Diversity and Why Is It Important?
- Employee Magnetism: Everything You Need to Know
- What Is Internal Mobility and Why Do You Need It?
- Employee Life Cycle: Meaning, Stages, Strategies & Examples
- How to Make Your Work-From-Home Policy More Effective?
- What Is A 9/80 Schedule?
- Best Employee Behavior & Talent Management Assessment Tools in 2024
- 10 Best Candidate Relationship Management Software in 2024
- Top 10 Employee Pulse Survey Tools in 2024
- 10 Best Remote Work Tools for Remote Teams in 2024
- 10 Best Employee Evaluation Software of 2024
- Top 10 Employee Perks Programs for 2024
- 10 Best Employee Scheduling Software in 2024
- Top Strategies to Reduce Employee Turnover in 2024
- Why Transparency is the Secret to Improving Employee Experience?
- Agile Working vs. Activity-Based Working
- Hybrid Work Policies for Employees: Guidelines, Best Practices & Examples
- Job Characteristics Model: A Complete Guide
- What is a Communication Breakdown in the Workplace?
- What is a Toxic Work Environment?
- What is a Returnship Program & Why It Can Soothe Your Hiring Blues?
- 10 Best Employee Advocacy Software in 2024
- Employee Turnover vs Attrition
- Hybrid Work Model vs. Remote Work: What's Better For You?
- What is Gaslighting at Work & How to Identify It?
- Self Fulfilling Prophecy - Definition, Pros, Cons & Examples
- How to Maximize The 24-Hour Work Cycle?
- Grumpy Staying: Meaning, Signs, Causes & How to Address It
- The Complete Guide on Presenteeism in the Workplace
- Absenteeism in the Workplace: Impact, Causes, Policies & Solutions
- 10 Best Team Management Software 2024
- Job Abandonment: Meaning & Its Importance
- How to Prepare for a Skip-Level Meeting as an Employee?
- What is Scrum Meeting, Its Types, Components, and Benefits?
- How to Create a Positive Work Environment?
- How to Address Insubordination in the Workplace?
- Popular #Workplace Hashtags in 2023
- How to Improve Employee Satisfaction with Workplace Bonding?
- Role of Talent Intelligence in Company Culture
- What is High-Performance Culture & How to Create It?
- What is Employee Stack Ranking?
- What is eNPS (Employee Net Promoter) Score?
- Quiet Thriving: Everything You Need to Know
- The Benefits and Challenges of Implementing a 4-day Work Week
- The Importance of Mental Health and Well-being Programs in the Workplace
- The Benefits of Hybrid Work Model for Organizations
- How to Create a Culture of Diversity, Equity, and Inclusion in the Workplace?
- Top Tips for Mastering Meeting Etiquette
- What is Quiet Quitting?
- What Is Organizational Culture?
- Top Tips For Effective Communication In The Workplace
- Top Employee Engagement Trends for 2023
- How to Create an LGBTQ Inclusive Workplace?
- How Do You Maximize Productivity in a Hybrid Work Environment?
- Understanding Intrinsic and Extrinsic Motivation
- How to Empower Employees in the Workplace
- Developing a Social Media Recruiting Strategy
- What are Pre-Employment Assessments?
- Top 10 Ways to Motivate Employees and Increase Productivity
- Different Types of Harassment in the Workplace
- What is Employee Recognition?
- How to Improve Employee Engagement
- Effective Ways to Change Your Employees' Behavior
- Employee Turnover and Retention Trends for 2022
- Why should a Company Need an Employee Gift Policy
- What is the Performance Improvement Plan (PIP)?
- Steps to Effective Change Management for HR
- What is HR's Role in Ethics?
- How to Handle Employee Complaints and Concerns
- Different Types of Psychological Testing Used in the Workplace
- What Is a Non-Compete Agreement in HR?
- How to conduct effective workplace investigations
- What are the Essential Functions of a Job Under the ADA
- When and How Employers Test for Drug and Alcohol Use
- Employer of Record
-
Hiring and Employment Practices
- Guide
- Tools & Suppliers
- What is the Employee Interview Scorecard? A Complete Guide for Hiring Teamshi
- 10 Best Contractor Management Software in 2025
- Global Hiring Insights: Key Strategies for Growing Business Success
- 10 Best Staff Augmentation Software in 2025
- Recruitment Compliance: All You Need to Know in 2025
- What Makes a Hiring Test Legally Compliant?
- Legal and Compliance Checklist for Hiring in 2025
- How Can An Employer Avoid Hiring the Wrong Person?
- Big Five Personality Test: Smarter Hiring, Stronger Teams
- Top 10 Modern Recruitment Techniques For Your Hiring Process
- Types of Hiring Biases & How to Avoid Them
- Why is Advertising Important in the Recruitment Process?
- Top 11 Recruitment Process Outsourcing (RPO) Companies in 2025
- What is Innovative Recruiting & Why Does It Matter?
- What is Recruitment Enablement? The Ultimate Guide
- 10 Best Employee Retention Software in 2025
- Benefit of using Global Employer of Record (EOR)
- Human Proctoring vs. AI Proctoring: A Comprehensive Guide
- What are Gamified Assessments? A Complete Guide for 2025
- 10 Effective Strategies to Close the Board Diversity Gap
- Multigenerational Workforce: Meaning, Benefits, Challenges & Best Practices
- What is Diverse Slate Hiring in HR? A Complete Guide
- How to Scale Hiring for an Early-Stage Startup?
- How To Create A Recruitment/Hiring Process Flowchart?
- What is Employee Poaching & How to Deal With It?
- AI in Recruitment 2024: A Definitive Guide for HR Professionals
- Everything You Need To Know About High-Volume Hiring
- Mobile Recruitment 2024: A Definitive Guide
- Top 10 Employee Retention Strategies for 2024
- What Does Recruitment Scam Notice Mean & How to Spot It?
- The Cost of Vacancy: Definition, Process, Formula & Example
- 7 Best Hiring and Onboarding Tools for HR in 2024
- 11 Best Workforce Management Software in 2024
- What is AI Contract Management?
- Contractor Overtime: Overtime Rules for Remote Contractors
- How to Plan Your Recruitment Budget in 2024?
- What is A Talent Acquisition Partner?
- Hybrid Recruitment: Definition, Types, Tips, Benefits & Examples
- Employee Offboarding: Meaning, Checklist, Process & Best Practices
- How to Attract and Retain Gen Z Talent?
- Recruitment Process Outsourcing (RPO): A Complete Guide for Recruiters
- 10 Best Recruitment Podcasts You Need To Listen To In 2023
- Data-Driven Recruitment: Secrets, Strategies & Benefits
- How to Write a Perfect Candidate Rejection Email?
- What is Talent Mapping?
- What is a Hiring Freeze?
- What is Lean Recruitment?
- What Sourcing Strategies Do You Use to Recruit Passive Candidates?
- What is Employer Value Proposition and How to Create It?
- Top 10 Innovative Pre-boarding Strategies to Keep New Hires Engaged
- Best Ways to Improve your Hiring Process
- Best Practices to Hire and Recruit Veterans
- What is Value-Based Recruitment, and Why is it Critical to Success?
- What is Employee Screening?
- 6 Ways to Attract and Retain Top Talent
- Why is Employee Onboarding Important?
- Consequences of Independent Contractor Misclassification
- Steps to HR Performance Management for Teams
- How to Successfully Select and Implement HRIS
- What Is a Probationary Period in an Employment Setting?
- Best Tips for a Killer Employee Referral Program
- What are the IRS Rules Surrounding Contractual Employment?
- How the FMLA Affects Your Company
- How Do I Pay an Independent Contractor
- Employees Have Differences in How They Are Classified and Paid
-
Human Resources Careers
- Guide
- Tools & Suppliers
- Top 10 Most Creative HR Job Titles
- Top 10 Employee Benefits Certifications for Professionals in 2025
- Importance of Ethics in Human Resource Management
- Top 10 HR Tech Influencers in 2024
- 10 Best HR Apps to Simplify the Workday of an HR Manager 2024
- 12 Best Virtual Career Fair Platforms in 2024
- 10 HR Analytics Courses Online To Check Out in 2024
- Top Most Important HR Metrics You Need to Track
- List of A-Z Human Resource (HR) Jargons
- Top 10 HR Books to Read in 2023
- A Complete Guide to HR Career Paths
- What Does HR Do All Day?
- HR OKRs: All You Need to Know
- 10 Best HR Skills That Every HR Professional Needs
- Top Reasons to Use Pre-Employment Skills Testing
- 5 Best HR Management Certifications in 2022
- What is Progressive Discipline in the Workplace?
- What does Chief Human Resources Officer mean?
-
Human Resources Information Systems
- Guide
- Tools & Suppliers
- What Is Global Human Resource Management (GHRM)?hu
- 10 Best HR Software for Consulting Business in 2025
- 11 Best HR Reporting Software in 2025
- 11 Best HR Compliance Software 2025
- HR Risk Management: Guide to Identifying & Mitigating Risks
- Top 10 HR Analytics Tools in 2025
- 13 Best Cloud HR Software Systems in 2025
- 11 Best HR Software for Small Businesses in 2025
- Top 14 Global HR Services Providers 2025
- 10 Best Enterprise HR Software Systems in 2025
- 10 Best HR Software for Startups in 2025
- 11 Best Team Collaboration Software Tools in 2025
- 10 Best HR Workflow Software in 2025
- 10 Best Restaurant Scheduling Software & Apps in 2025
- 14 Best Workforce Planning Software in 2025
- Top 11 People Analytics Software in 2025
- 10 Best AI Courses for HR Professionals
- Top 10 HR Chatbots in 2025
- 10 Best HR Software for Hospitality Business in 2025
- 10 Best ERP Software for Service Business in 2025
- 10 Best HR Software for Manufacturing Business in 2025
- 10 Best Online/Virtual Meeting Platforms for Teams in 2025
- 10 Best HR Software for Logistics Business in 2025
- 11 Best HRMS (Human Resource Management) Software in 2025
- Top 10 Mobile Workforce Management Software & Apps in 2025
- 10 Best Workforce Analytics Software in 2025
- 10 Best One-on-One Meeting Software for HR in 2025
- Top 12 HR Accounting Software in 2025
- 10 Best Employee Directory Software in 2025
- 30+ Workforce Planning Metrics to Track in 2025
- 10 Best AI Tools for HR Automation in 2025
- The Role of HR in CMMS Implementation Success
- Discriminant Validity: Meaning, Formula & Examples in HR
- 10 Best Task Management Software for 2025
- Best HR Technology Consulting Firms: Helping Businesses Evolve
- 10 Best Talent Assessment Tools in 2025
- Top 10 Meeting Management Software in 2025
- 10 Internal Communication Tools in 2025
- 10 Useful Mobile Apps for HR Management
- 10+ Must-Subscribe HR Newsletters to Stay Ahead of the PeopleOps Pack
- Top 11 Professional Employer Organizations (PEO) for 2025
- 10 Best Healthcare HR Software Solutions in 2025
- 10 Best HR Software for Construction Companies in 2025
- What is Criterion-related Validity in HR?
- What is Role Mapping in HR?
- Best HRIS Software Solutions 2025
- The Importance of Unified HR Solutions in 2025
- 12 Best HR Consulting Services In 2025
- What is a PESTLE Analysis for HR Industry?
- What Is Virtual HR and How Can You Use It Effectively?
- 10 Best Leave Management Software 2025
- What is Employee Moonlighting? How can HR Detect & Prevent It?
- Tactical HR and Strategic HR – Why You Need Both
- Types of HR Operating Models
- What is Organizational Restructuring in HR?
- Organizational Climate: Meaning, Importance, Types & Example
- Top 10 HR Ticketing Systems in 2025
- What is the Role of HR in Data Protection?
- Why Recruitment and Selection is Important to HR?
- Top 10 HR Models Every HR Practitioner Should Know in 2025
- The HR Scorecard: A Complete Guide
- 10 Types of Employment Contracts
- Human Resource Planning: Meaning, Process, Types, & Importance
- HR Audit: Meaning, Importance, Types, Process & Benefits
- 10 Best HR Training Programs for 2025
- 10 Best Talent Management Software in 2025
- What is Predictive Validity in HR?
- What is Regretted Attrition and How Can HR Reduce It?
- Boundaryless HR: What it is & Why It Matters
- Employee Data: Meaning, Types, and Best Practices
- What is Headcount Reporting? A Complete Guide for Employers
- How will Web 3.0 Impact the Future of HR Tech?
- HRIS vs. ATS: Which HR Tool Best Fits Your Business Hiring Needs?
- HRIS vs HCM vs HRMS: What's the Difference?
- Top 10 Practices to Boost HR Tech Adoption
- What is HR Effectiveness & How to Measure It? Examples, KPIs
- What is the HR Value Proposition & How to Measure It?
- Job Enrichment: Meaning, Methods, Models, Benefits & Examples
- What is Job Enlargement? A Complete Guide
- Top 10 HR Document Management Software in 2024
- How to Choose the Best HR Software for your Business in 2024
- 10 Best Employee Database Software in 2024
- 11 Best Human Capital Management (HCM) Software in 2024
- 11 Best Org (Organizational) Chart Software in 2024
- 10 Best Punch List Software of 2024
- A Complete Guide on Contract Migration
- Top 10 Event Planning Tools for HR in 2024
- 10 Best HR Database Software in 2024
- 10 Best Electronic Signature Software 2024
- 10 Best Goal-Setting Software Of 2024 For Teams
- 10 Best Free HR Software in 2024
- What is Talent Optimization?
- Workforce Analytics: Definition, Types, Benefits, Trends & Examples
- On-Premise vs Cloud-Based HR Software
- How HR can Support Employees with Disabilities?
- Understanding Bereavement Leave: An Employer's Guide
- What is the 9 Box Grid Model in HRM?
- Digital HR: Meaning, Benefits & Implementation
- What are the 6 Stages of HR Digital Transformation?
- What is the Difference Between HRM and HRD?
- Employee Cost: How to Calculate the Cost of an Employee?
- What is the Notice Period in HR?
- Cross-Functional Team Collaboration Guide
- 10 Best Time Management Tools in 2024
- What Is Sabbatical Leave?
- Top 10 Tips to Manage Employee Time-Off
- 10 Best Task Management Software for 2024
- Top 10 Professional Employer Organizations (PEO) for 2024
- 10 Best Team Collaboration Software Tools in 2023
- Workforce Planning Model: Process, Benefits, Elements & Examples
- What is HR Service Delivery? Definition, Models & Benefits
- What is the Talent Transformation Process?
- What HR Leaders Need to Know About Deepfake Technology?
- Gen-AI in HR: Boosting Employee Engagement and Productivity
- 10 Best Employee Handbook Software in 2024
- 10 Best Work Schedule Apps for Teams in 2024
- 10 Best HR Case Management Software 2024
- 10 Best Open Source HR Software in 2024
- 10 Best Slack Communities for HR Professionals
- What is Human Resource Outsourcing?
- What is a Skills-Based Organization & How to Build It?
- Talent Planning: A Complete Guide
- The Role of Generative AI in HR Development
- HR KPIs: All You Need to Know
- How to Use ChatGPT to Enhance HR Processes
- Top Strategies to Improve the Employee Experience of the Deskless Workers
- The Ethics of AI in HR: Balancing Efficiency and Fairness
- The Role of HR in Creating a Positive Employee Experience
- Top 10 HR Technology Trends in 2023
- HR Goals and Objectives 2023
- List of Best HR Conferences in 2022
- HR Automation: Future, Benefits & Examples
- What are the Challenges Faced by Human Resource Management
- How to create electronic personnel files
- HR Compliance- Reporting New Employees
- What does PEO stand for in HR?
- System Security (HRIS) – How We Keep Your Data Safe
- What is Human Capital Management (HCM)?
- Headcount Planning Strategies to Drive Success
- What is HRIS?
- Job Duties and Importance of HR Compensation Managers
- Labor Relations - Unions
-
Legal Aspects - Employment Law
- Guide
- Tools & Suppliers
- An Employer Guide to Name Changes
- 5 Best Employment Law Firms in 2025
- The Legal and Ethical Considerations of Employee Monitoring in the Digital Age
- All You Need to Know About Jury Duty Leave
- Employer Mandatory Vaccine Policies
- Everything HR Needs to Know About EEOC
- HR Laws Every Industry Professional Should Know
- 5 Compliance Issues Every HR Should Know
- Challenges Facing HR in Merger & Acquisitions
- What are the Benefits of Reduction in Force (Mass Layoffs)?
- Job Description Requirements by Law
- Criminal Penalties for Human Resources Violations
- Title VII of the Civil Rights Act: What Organizations Need to Know
- HR Support on Protecting Intellectual Property at Work
- Things You Need to Know About Department of Labor Audits
- Unpaid Payroll Tax Penalties and Fines for Businesses
- Examples of Independent Contractors and Employees
-
Performance Management
- Guide
- Tools & Suppliers
- Role of AI in Performance Management
- Best Performance Management Tools in 2025
- 10 Best Employee Performance Review Software 2025
- 10 Best Performance Testing Tools in 2025
- What are the Traditional Methods of Performance Appraisal?
- Top 10 Employee Monitoring Software For 2025
- Performance Goals vs Development Goals
- How to Give a Negative Employee Performance Review
- What is Performance Enablement & Why Is It Important?
- What is Talent Density and How to Create It?
- What Are Performance Goals at Work and Why You Need Them
- 10 Best Succession Planning Assessment Tools for 2024
- What is Remote Performance Management & How to Manage It?
- Employee Performance Measurement in 2024
- A Complete Guide to Skill Will Matrix
- What is Continuous Performance Management?
- Best Performance Management Tools in 2024
- 10 Best EPM (Enterprise Performance Management) Software of 2024
- What is Competency Mapping in HR?
- Employee Incentive Programs: Benefits and Examples
- 10 Best OKR Software in 2024
- The Complete Guide To Employee Check-Ins
- The Benefits of Performance Ranking for Employees
- 10 Performance Review Tips That Should Help Build Productivity in Your Team
- What HR People Need to Know About Succession Planning
- Proven Best Tips on Self Reviews for Employees
- Goals for Employee Performance Review Program
- Advantages and Disadvantages of Pay-for-Performance Policies
-
Training & Development
- Guide
- Tools & Suppliers
- 13 Best Learning Management Systems (LMS) for Employee Training in 2025
- 11 Best Learning Management Systems (LMS) for Small Businesses 2025
- 10 Best Skills Tracking & Management Software 2025
- 10 Best Employee Training Software in 2025
- Top 10 Skills Matrix Software 2025
- 10 Best Training Management Software in 2025
- Top Skills Mapping Software Tools in 2025
- What is Competency-Based Training? A Complete Guide
- Top 10 Benefits of Employee Training and Development in the Workplace in 2024
- 10 Best AI Training Video Generators for 2025
- 10 Best Virtual Training Platforms for 2025
- 10 Best Employee Training Tracking Software 2025
- What is Peer Coaching? A Comprehensive Guide
- What is Sensitivity Training & Why It Is Important in the Workplace?
- ADDIE vs. SAM Model: How to Choose The Best Training Model for You?
- 10 Best Employee Mentoring Software in 2024
- 10 Best eLearning Authoring Tools in 2024
- 10 Best Learning Experience Platforms (LXP) in 2024
- What is a Training Matrix for Employees?
- How to Implement Cross Training in the Workplace?
- Steps to Create an Impactful Employee Development Plan
- Why is Upskilling and Reskilling Important?
- On-the-job Training: Expectations VS Reality
- How to Develop Situational Leadership Skills
- 20 Best Virtual Team Building Activities in 2022
- Top 10 Benefits of Remote Working for Employers
- Executive Participation in Performance Development Plans Sets the Model
- Corporate Compliance Training Trends for 2019
- How to Develop a Code of Conduct for a Company
- Top 5 Workplace Mentoring Program Types
-
Compensation and Benefits Practices
-
Finance & Taxes
-
Benefits Taxable and Non Taxable
- Guide
- Tools & Suppliers
- 16 Best Financial Wellness Software in 2025
- Types of Employee Benefits You Should Consider
- What Is a Qualified Retirement Plan?
- Employee Wellness Program Ideas that will help you Attract Top Talent
- What Is Minimum Essential Coverage?
- The Basics of Prescription Drug Plans
- Owners Guide to Payroll Taxes
- What is a Section 125 Plan?
- How a Health Reimbursement Arrangement Works
- Understanding Employee Health and Disability Benefits
- Compensation/Pay
- Payroll
-
Taxes and Withholding
- Guide
- Tools & Suppliers
- Proof of Investment Submission: Employer's Guide to Processing POI
- What is State Income Tax Withholding?
- Payroll Taxes and Employer Responsibilities
- FICA Tax Funds Retirement and Medical Benefits for Retirees
- What is the Difference Between an Employee and an Independent Contractor?
- Employer's Liability for Employment Taxes
- Are Employers Required to Withhold Taxes on an Hourly Employee
- Keeping Your Business Compliant With Payroll Tax Requirements
- Navigating Multistate Unemployment Tax Reporting and Remittance
-
Benefits Taxable and Non Taxable
-
Recruiting
-
Applicant Tracking System (ATS)
- Guide
- Tools & Suppliers
- 10 Best AI-Powered ATS Software in 2025
- Why Legacy ATS Tools Fail Enterprise Hiring Teams?
- Top 10 Free Applicant Tracking Systems (ATS) in 2025
- Top 24 Applicant Tracking Systems 2025
- What is an Open Source ATS?
- What is ATS Workflow? A Comprehensive Guide
- What is an Applicant Tracking System (ATS)?
- Background Checks
- Branding
- Employee Referrals
- Employee Relocation
-
Employment Offers
- Guide
- Tools & Suppliers
- Reasons Why Employers Withdraw a Job Offer
- 5 Best Employment Tools in 2024
- Top Reasons Why Candidates Reject Job Offers
- What Needs to Be Included in a Job Offer Letter?
- 5 Ways How HR Managers Can Be Successful in Salary Negotiations
- What Is a Conditional Letter of Employment?
- How to Write a Letter of Employment Offer
- HR Hiring Policy & Procedures
- Internships
-
Interviewing
- Guide
- Tools & Suppliers
- 12 Best Video Interviewing Tools in 2025
- 13 Best Interview Scheduling Software in 2025
- STAR Method for Interviews and How to Use It?
- 10 Best Video Interviewing Tools in 2024
- Pre-Recorded Video Interviews: Introduction, Tips and Best Practices
- How to improve your Interview Scheduling Process?
- Job Boards
- Job Descriptions
- Job Posting (Advertising)
- Legal Aspects (Hiring & On-boarding)
- Post-Offer Activities
- Pre-screening Interview
-
Recruiting Agency/Firms
- Guide
- Tools & Suppliers
- 11 Best HR Outsourcing Services & Companies in 2025
- Top 12 Recruitment CRM Systems in 2025
- 10 Best Executive Search Software in 2025
- Top 12 Free Recruiting Software in 2025
- 10 Best Staffing Agency Software for Recruitment Firms in 2025
- Top 10 Reverse Recruiting Services in 2025
- Top 10 Recruiting Software for Small Businesses in 2025
- 8 Warning Signs to Avoid When Choosing an RPO Provider
- 10 Best Global Recruiting Providers for 2025
- Things You Must Know When Working with an Executive Recruiter
- Top AI and ML Consulting Firms in 2025
- What is Rockstar Recruiting? A Comprehensive Guide
- Top 10 Interim Executive Search Firms in 2025
- How Will AI Change Executive Search?
- The Benefits & Challenges of Recruiting for High-Net-Worth Individuals
- How RPO Pricing Model Works: A Simple Explanation for Businesses
- Outsourcing vs. Offshoring: Unlock the Key Differences
- Outsourcing vs. Outstaffing: Key Differences Explained
- What Is a Hybrid Fee Structure? A Comprehensive Guide
- What is the Virtual Employment Model?
- Hourly Rate Fee Structures: A Transparent Approach to Recruitment Pricing
- What is Offshore Outsourcing? A Complete Guide
- Understanding Flat Fee Structure Recruitment: A Cost-Effective Hiring Solution
- Retainer Fee Structures Explained: Benefits and Best Practices
- What is the Contingency Fee Structure?
- Top 10 Franchise Recruiting Firms to Watch
- What are C-Suite Executives? A Guide for Employers
- 8 Common Recruiting Mistakes to Avoid
- Recruitment Team: Meaning, Size, Structure & Outsourcing
- Retail Recruiting: Everything You Need to Know
- What Are The 7 Stages of The Recruitment Process?
- What is a Recruitment Management System (RMS)?
- Top YouTube Recruitment Channels for Recruiters to Follow
- What is the Client Recruitment Blueprint?
- Recruitment Agency vs. Freelancer vs. In-House Team: Which is Best for Your Hiring Needs
- What is a Retainer in Recruitment?
- What is a Specialist Recruitment Agency & Which Industry Can Benefit Most?
- How to Choose the Right Executive Search Firm?
- What are Recruitment Fees & Its Types?
- Retained Search: The Ultimate Guide
- Top 6 Recruitment Agencies in 2024
-
Recruiting Metrics
- Guide
- Tools & Suppliers
- How to Choose the Right Recruitment Tracker?
- How to Build a Recruitment Center of Excellence? Key Strategies & Best Practices
- Centralized vs Decentralized Recruitment: Which Model Fits Your Organization Best?
- 50+ Recruitment Statistics Every HR Should Know in 2025
- 10 Best Recruitment Analytics Software in 2025
- Recruiter Burnout: Causes, Symptoms, and Ways to Overcome It
- Understanding the 4 Cs of Talent Management
- What is Gamification in Recruiting and How It Works?
- Key Talent Acquisition Metrics You Should Track in 2024
- The Ultimate Guide to Recruitment Marketing
- What is a Recruiting Dashboard?
- How Do You Recruit Top Talent On A Small Budget?
- Reference Checks
- Resumes
- Social Media Recruitment
-
Applicant Tracking System (ATS)
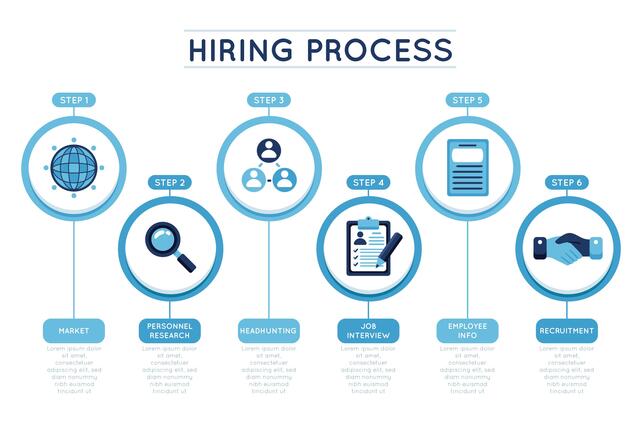
How To Create A Recruitment/Hiring Process Flowchart?
In today’s competitive business environment, having a well-structured recruitment process is crucial to attracting and retaining top talent. A recruitment or hiring process flowchart is a visual representation that outlines each step in the recruitment process, helping HR professionals and hiring managers to streamline operations, improve efficiency, and ensure a consistent candidate experience. This guide will walk you through the steps to create an effective recruitment process flowchart, from understanding its importance to detailing each phase of the recruitment journey.
Why a Recruitment Process Flowchart is Essential?
A recruitment process flowchart serves as a roadmap for the entire hiring process, providing clarity and structure. It ensures that all stakeholders, from HR to department heads, are on the same page, reducing the likelihood of miscommunication and errors. Additionally, a well-defined flowchart helps in:
- Standardizing the Hiring Process: Ensures consistency across different departments and job roles.
- Identifying Bottlenecks: Helps pinpoint areas that cause delays or inefficiencies in the hiring process.
- Improving Candidate Experience: Provides a clear path for candidates, leading to better communication and engagement.
- Facilitating Decision Making: Helps hiring managers make informed decisions at each stage of the process.
- Compliance and Documentation: Ensures that all necessary steps are documented, aiding in legal compliance.
Steps to Create a Recruitment Process Flowchart
1. Understand the Key Stages of Recruitment
Before creating a flowchart, it’s essential to outline the key stages involved in the recruitment process. While the specific steps can vary depending on the organization and role, a typical recruitment process includes:
- Job Analysis and Requirement Identification: Defining the job role, qualifications, and skills needed.
- Job Posting and Sourcing: Advertising the job opening through various channels.
- Application Screening: Reviewing resumes and applications to shortlist candidates.
- Interviews and Assessments: Conducting interviews and tests to evaluate candidates.
- Background Checks and References: Verifying candidate information and references.
- Job Offer and Negotiation: Extending an offer and negotiating terms.
- Onboarding: Integrating the new hire into the organization.
2. Map Out Each Stage in Detail
Once you have identified the key stages, the next step is to map out each stage in detail. This involves breaking down each stage into smaller steps. For example:
2.1. Job Analysis and Requirement Identification:
- Conduct a job analysis with department heads.
- Draft a job description and required qualifications.
- Get approval from relevant stakeholders.
2.2. Job Posting and Sourcing:
- Choose recruitment channels (e.g., job boards, social media).
- Post the job ad with a clear deadline.
- Actively search for candidates using LinkedIn or recruitment agencies.
2.3. Application Screening:
- Collect and organize applications.
- Use an Applicant Tracking System (ATS) to filter applications.
- Shortlist candidates based on predefined criteria.
Each of these steps can be further broken down depending on the complexity of the hiring process.
3. Choose the Right Flowchart Tools
Creating a flowchart can be done using various tools, from simple pen and paper to sophisticated software. Some popular tools include:
- Microsoft Visio: A versatile tool for creating detailed flowcharts.
- Lucidchart: An online tool that allows for easy collaboration.
- Google Drawings: A free tool integrated with Google Workspace, ideal for simple flowcharts.
- SmartDraw: Another option with templates specifically for HR processes.
- Canva: For visually appealing flowcharts with drag-and-drop features.
Choose the tool that best fits your needs and organizational requirements.
4. Design the Flowchart
Start by drawing a box or circle for each major stage of the recruitment process. Use arrows to indicate the flow from one stage to the next. For example:
Job Posting and Sourcing → Application Screening → Interviews and Assessments → Job Offer and Negotiation.
For each major stage, add sub-steps with smaller shapes connected by arrows. Use different colors or shapes to represent various decision points, such as “Yes/No” or “Pass/Fail.”
Ensure that the flowchart is easy to understand, with clear labels and concise descriptions. Avoid clutter by keeping the design simple and intuitive.
5. Include Decision Points and Alternative Paths
Decision points are critical in a recruitment flowchart, as they represent moments where the process can take different paths. For instance:
After the Application Screening stage, there might be a decision point: “Does the candidate meet the minimum qualifications?” with two paths:
Yes: Proceed to the Interviews and Assessments stage.
No: Send a rejection email or keep the candidate for future consideration.
Similarly, after Interviews and Assessments, the decision point could be “Is the candidate suitable for the role?” with paths leading to either extending a job offer or continuing the search.
These decision points help visualize the entire process, including potential detours and outcomes.
6. Validate and Test the Flowchart
Once the flowchart is complete, it’s essential to validate it with all relevant stakeholders, including HR, hiring managers, and department heads. Ensure that the flowchart accurately represents the process and that all steps are necessary and logical.
Testing the flowchart in a real recruitment scenario can help identify any gaps or areas for improvement. Use feedback from actual hiring experiences to refine the flowchart, making it more efficient and effective.
7. Implement and Share the Flowchart
After validation, implement the flowchart as part of your organization’s recruitment policy. Ensure that all stakeholders are trained on using the flowchart and understand their roles at each stage.
Sharing the flowchart across the organization is crucial for consistency. Consider including it in your company’s HR manual, onboarding materials, or internal communication platforms.
8. Review and Update Regularly
The recruitment process is dynamic and can evolve with changes in the organization or the job market. Regularly review and update the flowchart to reflect any new practices, tools, or legal requirements.
Incorporate feedback from recent hiring experiences to keep the flowchart relevant and effective. An outdated flowchart can lead to inefficiencies and inconsistencies, so continuous improvement is key.
Best Practices for Creating a Recruitment Process Flowchart
Creating an effective recruitment process flowchart requires careful planning and attention to detail. Here are some best practices to follow:
1. Keep It Simple
A flowchart should be easy to understand at a glance. Avoid overcrowding it with too much information. Focus on the main steps and key decision points, using minimal text and clear visuals. The goal is to provide a straightforward guide that everyone involved in the hiring process can follow without confusion.
2. Use Consistent Symbols
Consistency in using flowchart symbols is crucial for clarity. Standard symbols include:
- Ovals for start and end points.
- Rectangles for process steps.
- Diamonds for decision points.
- Arrows to show the flow direction.
Sticking to these conventions ensures that anyone familiar with flowcharts can easily interpret your diagram.
3. Color Code for Clarity
Color coding different stages or types of actions can enhance the visual appeal and functionality of your flowchart. For example:
- Green for initial stages like job posting.
- Blue for decision-making points.
- Red for termination points or rejections.
Using colors strategically helps stakeholders quickly identify different sections of the process and understand the flowchart’s structure.
4. Incorporate Feedback Loops
Recruitment is often iterative, with certain steps requiring a return to a previous stage (e.g., after a failed background check, the process might loop back to candidate sourcing). Clearly indicating these feedback loops helps ensure that your flowchart accurately reflects the realities of the hiring process.
5. Include Decision Points and Alternatives
Decision points, often represented by diamonds, are critical in the recruitment process. These are moments where the process can branch out depending on the outcome (e.g., a candidate passes or fails an interview). Clearly defining these decision points and their possible outcomes helps clarify what happens at each stage.
6. Make It Accessible
The flowchart should be easily accessible to all stakeholders involved in the recruitment process. Whether it’s shared digitally through a company intranet, included in an HR handbook, or printed and displayed in the HR office, ensuring that the flowchart is available to everyone is crucial for consistency.
7. Document Every Step
Even if a step seems obvious, document it in the flowchart. This ensures that nothing is overlooked, and it provides a complete guide for anyone new to the process. This level of detail is especially important in ensuring compliance with legal and organizational standards.
8. Test and Validate
Before finalizing the flowchart, test it in a real-world recruitment scenario. Gather feedback from the hiring team and refine the flowchart as necessary. Validation ensures that the flowchart is practical, user-friendly, and accurately represents the recruitment process.
9. Regularly Update the Flowchart
Recruitment processes evolve over time, especially as new technologies and practices are adopted. Regularly review and update the flowchart to reflect any changes. An outdated flowchart can lead to inefficiencies and confusion, so maintaining its relevance is key.
10. Align with Company Policies
Ensure that the flowchart aligns with your company’s HR policies and legal requirements. Any deviations or updates in policy should be reflected in the flowchart to maintain compliance and consistency across the organization.
11. Make It Collaborative
Involve key stakeholders in the creation and revision of the flowchart. This includes HR professionals, hiring managers, and department heads. Collaboration ensures that the flowchart is comprehensive and meets the needs of all parties involved in the recruitment process.
12. Provide Training and Support
Once the flowchart is created, provide training to those who will be using it. Ensure they understand how to interpret and implement the steps in the flowchart. Offering support and resources, such as a guide or FAQ, can help smooth the adoption process.
By following these best practices, you can create a recruitment process flowchart that not only enhances the efficiency and effectiveness of your hiring process but also ensures a consistent and positive experience for all stakeholders involved.
Conclusion
Creating a recruitment or hiring process flowchart is an essential step in optimizing your organization’s hiring efforts. It not only provides a clear roadmap for the recruitment process but also ensures consistency, efficiency, and a positive candidate experience. By following the steps outlined in this guide, you can design a flowchart that meets your organization’s needs, supports effective decision-making, and ultimately helps you secure the best talent for your team.
Related Content
-
Training & Development

Executive Participation in Performance Development Plans Sets the Model
The executive and employees of every organization need to work hand in hand in the realization of the organizational goals. ...

-
Hiring and Employment Practices

Steps to HR Performance Management for Teams
HR performance management is a continually evolving field. Every year, new performance management styles keep propping up, and HR departments ...
-
Employee Conduct/Behavior

Top 10 Employee Appreciation Messages
In any business, employees are its greatest asset. Recognizing their hard work and dedication through employee appreciation messages can boost ...